Showing posts with label makeup. Show all posts

Sunday, March 2, 2014

How I Upped My Makeup Game

There are few things I think I need to say first and foremost. I have learned everything I know by trial and error. I am not a professional. Secondly, I feel that makeup should be fun and if it works for you- ROCK IT! We are too hard on each other. What may look like crap to me actually makes that girl feel like a beautiful princess! Lastly, there are higher end products than what I have that probably do a better job. However, I am all about beauty on a budget. I get most of my stuff at Target or at the drugstore.

That before? That's not an uncommon makeup look I used to rock. I really tried not to overdo how I previously did my makeup. That is really how I wore it.

Quick and dirty on what have I changed and what have I learned

  • Skincare, skincare, skincare
  • Primer sets the stage whether for foundation or eyeshadow
  • Eyebrows- Framing for your eyes, learn to do them! 
  • Eyeliner- Now it is always under my lash line on my lower lashes
  • Bronzer- Not just something you put your blush on top of
  • Pink frosty lips do not equal nude lips (I used to think only a light lipstick if you have smokey eyes)
  • Smokey eyes can be done in a variety of colors but black and silver are harsh
  • Eyeshadow primer can make a difference for even the cheapest of shadows
  • Tools matter- maybe even more than the makeup
  • The angle at which I curl my eyelashes matters
Now to get a little more in depth: 

Step 1: Skin. For me that generally includes serum, daytime eye moisturizer, face moisturizer and primer. 

Primer makes a big different in my makeup. I have two different types depending on the look. The pixi primer is more of a luminescent dewy look, and the face perfector is a more of a matte look. (Unfortunately they no longer make that pixi primer. Sad day! I'll be on the lookout for a different option) 

Step 2: Foundation: Since I followed my skin routine including primer I will use regular foundation instead of a BB cream (I use that when I want to combine some steps). Today happens to be Colorstay Foundation by Revlon in 200 (nude). Sometimes I use a makeup sponge, today I used my fingers. 


Step 3: Highlight and Contour (HAC). My highlight and contour leaves a lot of room for improvement. It is a new step for me. (Please don't cringe, its a work in progress!) Lets just called it a modified HAC. I'm not sure I love the super dark with super light HAC routines I've seen. I use a concealer in the lightest shade (usually an ivory) and draw a line up the center of my nose and then fan out onto my forehead, an inverted triangle under my eyes, and a bit on my chin. The inverted triangle under my eyes does a a wonder for my dark circles and for the rosacea redness of my cheeks (which has improved greatly with better skin care). While that sets for a minute I take a bit of bronzer and darken the hollows below my cheek bone, and sometimes I used a bit on my nose to contour, and then under my jaw line.


Next I use my fabulous favorite tool: my buki brush! This is perfect for blending. I love this brush so much and could not live without anymore! This is more densely packed than an all out full size kabuki brush. Mine is a Bare Escentuals (Minerals) you can check out here for 20 bucks. Or for a cheaper version I would recommend the Coastal Scents brand here for 4.95. I use circular motions to blend in my concealer/bronzer. Depending on how my skin is doing, sometimes I use a stippling motion to blend the concealer out just where the edges are. This brush also works great with Bare Minerals loose foundation to give a heavier/thicker application. After blending I lightly sweep bronzer with in an E motion from around my forehead, hollows of my cheeks, under my jaw. I'm currently using a pixi bronzer I am sampling from Ipsy. 


Step 4: Blush. Nothin' fancy. I have a bare minerals blush brush that I use and apply from the apples of my cheeks (I usually smile a big cheesy smile and hit em right on) then I go outward along my cheekbone toward my ear. When I am feeling a bit fancy I will use a luminizer/brightener I got from Bare Minerals just on the top of my cheekbones near the outer corner of my eyes. 


Perhaps a bit better blending on my bronzer on the left but you get the idea. Before when I used to just use bronzer on my cheekbones followed by blush on my cheekbones it gave me quite the baked potato face. You can also see how the bit of bronzer around my hairline and under my jaw gives my face better dimension. Not just flat face. 

Step 5: Brows. I'll do a full brow tutorial at a later date with better pics. In the meantime here is a tutorial I like here. I use a blonde eyebrow pencil from Avon (I purchased for 1.99 on sale!) and make an outline. I draw the top and the bottom of my eyebrows. I left my natural brow shape be my guide. Next I use a blonde eyebrow powder from Nyx to fill in between my lines using the provided brush. (5.99 at Target) Then I take my lovely buki brush and brush it over the top just to soften the edges. My Nyx kit comes with a spoolie if you prefer to soften the look by brushing the powder with it instead. Then I use the wax to set them in place. I would say pencils tend to look harsh, so if you aren't using an eyebrow powder, consider it. 


Step 6: Eyeshadow and mascara. I have found that using an eyeshadow primer really helps me. I use a Nyx pearl (shimmery) base, but they also have plain white, nude, and beige and its relatively cheap at 6.99.  You can pick it up at Target or Ulta.


I won't due a full tutorial on my eyeshadow today, but I've learned a few things.

First thing: Brushes, brushes, brushes. It will make a difference. I have tons of different brands of brushes, but my current favorites are Coastal Scents. Great quality and easy on the wallet. Also, I never use eyeliner under my eye. I use eyeshadow underneath my lower lashes smudged with a dome shadow brush. A small dome shadow brush is your friend. It works great for your crease as well as smudging things out. I started with an Avon one but have upgraded (even though it cost less) to this dome brush from Coastal Scents. You can see the middle of my lid is the palest color darkening at the edges and into my crease. I always use a light (but not silver) color for my brown bone. Shoot for pale skin color. My liner is not a huge thick line, just a nice tight line along the lashes (I used a Sephora liquid liner in brown today). Next so there aren't any dramatic lines I use a blender to blend the color. Again, mine is Coastal Scents. Previously I used a fluffy old school kaboodles brush. The blender works better. Haha. Seriously, tools make a difference so go buy some nice eyeshadow brushes!

Also do not be afraid of color. I used lots of purples and pinks here and it provides just as much of a smokey look as what I used to think black did. Black and silver are harsh. I'm not sure I will ever buy more of them. I've learned that liner doesn't need to be black to be dramatic either. This dark brown works great with the burgundies of my shadow.


This Chella highlighter does wonders on the brow bone just underneath the brows, sometimes I use a bit on the bridge of my nose. I highlight under my brows after I finish my eyeshadow and that just pat with my finger to blend.


Crimping my eyelashes with the curler at this angle rather than straight up and down gives a much better effect. I learned this little trick from pinterest and it actually works.
Have I mentioned that tools are important?! The way bristles are packed into the brush changes the amount of makeup they can hold and then put on your face. 

Two of my fave fave fave tools: My buki brush, and my doefoot blender brush. They are my little blending buddies. I can't live without them now. Even when I started using darker colors in my crease I wasn't blending very well. I'm sure I looked like a fool. 


 My beloved dome brushes! As you can see the Avon is a bit tighter and smaller. I like using this to apply eyeshadow below my lower lash line. The Coastal Scents brush is perfect for applying color into the crease of your eye. These have made a huge difference.


My final step is using a full size kabuki and loose powder. 

Wednesday, January 22, 2014

Ipsy, January 2014: A Review

This month was an ugly glam bag. I have had two months of bags that I absolutely loved. I guess it was about time to have a bag I didn't like. It's not that I mind the colors, but the silhouttes of the makeup products are a bit cheesy.. bleh.

This month my Ipsy Glam bag contained:
  • (MALIN + GOETZ) mojito lip balm
  • Benefit POREfessional 
  • Yaby Natural Finish Foundation in Buff
  • Absolute! Makeup Cleansing Tissue
  • Balanced Guru Body Balm


(MALIN + GOETZ) mojito lip balm.
First and foremost, I'd like to take a minute to complain about the packaging. It looks like a medicated ointment! I wouldn't really want to pull it out of my bag in front of anyone. Don't mind me while I put on my medicated ointment. Packaging does matter. It seems they went with a plain look, but the white with blue lettering? I am new to this brand, and they have not won me over. The actual lip balm is very greasy feeling. A little goes a long way and its hard to get just a little out of this tube. The lip balm has a little note "fatty acid absorption technology" on the front. What is that?! It doesn't say anywhere on the tube either. Or their website. Which seems to me like it doesn't really mean anything.... I've read through some testimonials of their other products. It seems their face care is their big seller. "Better than proactiv" Maybe I'll have to try something other than the lip gloss... As far as the mojito scent? I was hoping for party in a tube... it is barely scented. 12 dollars for a tube. No way would I pay that much!  

Benefit the POREfessional
As I've mentioned, my pothole pores can always use a little help. I was very excited to try this out because its on the spendy side. Thats the great thing about Ipsy! Try before you buy. 30 bucks for a tube over at Ulta. This really did a good job spackling over my pores and had a soft finish. However, now that I've tried it, a cheaper dupe would be Avon Magix face perfector, which I already own. Seriously very similar in formula. The Avon only costs 10 bucks! Check Magix out here. 

Here is the POREfessional under the Yaby foundation
What pores?!

Yaby natural finish liquid foundation
I love trying out different foundations! I was pleasantly surprised that it cost 13.55 from their website. It blended very well, was easy to work with, and provided a medium to full coverage without being cakey or too thick. The color I received was buff, and it seems to match my winter skin pretty well. It is something I would consider buying in the future. 

A! Absolute! Make-up Cleansing Tissues 
These sell for 6.99 over at Walgreens. That seems pretty average for makeup removal wipes. I honestly use wipes a lot in the evening. After a 12 hour shift I want easy makeup removal. The cucumber scent is nice. These do a nice job. 


Balanced Guru Body Balm
Egads! They charge 45 through their website for this body balm, and you will be surprised to learn it doesn't contain diamonds or gold. For the travel size, which I am sampling, it costs 12 dollars. That is too much for me to splurge on a body balm. This company does use organic ingredients, so if you are trying to use organic products you may want to check it out. It is a very strong citrusy scent. It also has an undertone that reminds me of Vick's vapor rub. 45 dollars for something that smells slightly medicated is just too much for me. It does not absorb into the skin very well and leaves my skin shimmery and shiny and a bit tacky. This product is not for me. Also, if you want me to recognize your brand name, you might make it a bit bigger on your packaging. Just sayin'

Join me on ipsy and subscribe to the Glam Bag! You get 4-5 beauty products every month delivered to your door, for just $10. Michelle Phan curates the bags! Check it out here

Friday, January 17, 2014

Lip Balm Love: Noya Kosher Natural Lip Balm

Wow. Just wow. I am very hard to please when it comes to lipbalm/chapstick/lipgloss etc. You can ask my coworkers because I readily dish out advice when they tell me they have chapped lips and are using something awful. Maybe obnoxiously so. "You use what?!" I guess I sort of have it out for a certain well known brand that has a lot claims but not a lot to back it up... but I digress.

Here is my love note:

I'll confess, I'm in love with a lip balm. I had a sample mishap with Ipsy and they promised to send me something I would "love". I have to say when I opened it up and saw this little lip balm I was a little disappointed. Lip balm? What is so great about lip balm? How is it different than any other lip balm? I get a lot of samples for lip products. Have you seen how many lip glosses, balms, pencils, stains, sticks, etc exist? But I was wrong... so wrong. Noya, you exceeded my expectations in so many ways! Go buy some. Seriously.

I received the Cherry flavor. Lets just talk first about the flavor. You know that fakey cherry flavor that is overhwhelmingly sweet and has a hint of plastic? That is not what you get here. You know a fresh juicy ripe cherry with some tangy tones as well. Like the actual fruit, for example. I wish I could articulate how great the flavoring is. Its the real deal people. They also have Spearmint, Vanilla, and Unscented/Flavored. Can't wait to try them all. I'm thinking unscented/flavored would be perfect for my manly man. (He would never be caught with the cherry although, honestly, who doesn't love cherry!)

The ingredient list is small, and things that I recognize! Coconut oil! I hear tons of buzz about coconut oil, so if you are into it, this product is for you! Organic extra virgin olive oil, stevia, beeswax, natural flavoring... I can pronounce all those words.

You know what else I love? Simple no gimmick packaging.

How does it wear? Soft. Not sticky at all. Not waxy at all (even with the beeswax as an ingredient). I put it on before a big sweat sesh at the gym. I did a hardcore 30 minute run, followed by 30 minutes of weight training. It was still on my lips after all of that without reapplying. You are going to want to reapply though because its darn good stuff!

Price point. Just about right. 3.99 through their website. Of course there is shipping charge which is kind of a bummer but to be expected. My recommendation, buy a couple of every flavor and then you will feel better about paying for shipping. Hopefully as this brand blossoms we can see it in more stores. There is a store locator option on the website but unfortunately none so far in my area.

Also, I've emailed Noya customer service and they are very quick to respond and quite friendly and personal. Love it. Love being treated like person. You an also feel good that for every balm purchased they give one the homeless. One of the questions I sent their way? Do you test on animals?! As you can see they gave me a resounding no, and some awesome images which I love and felt needed displayed on this blog.

No, I really haven't been paid to act like a fangirl over a lip balm. Yes, I really do adore it that much. Check out the Noya brand here.


bareMinerals Bring on The Night: Review


Can I say that I am in LOVE with this collection. I purchased this at Ulta. The bad news is that I can't seem to find it at Ulta, Sephora or QVC to send you in that direction. I'll review the products and colors for you as they may pop up individually or in new collections. I'm sure you could darken up the look, but to me it is a romantic look perfect for Valentines day coming up!

I've been a bareMinerals fan for a very long time, and this made me fall back in love with the brand.


This color collection includes 8 great pieces:
Mineral Veil Finishing Powder
Matte Eyecolor: Queen Phyllis
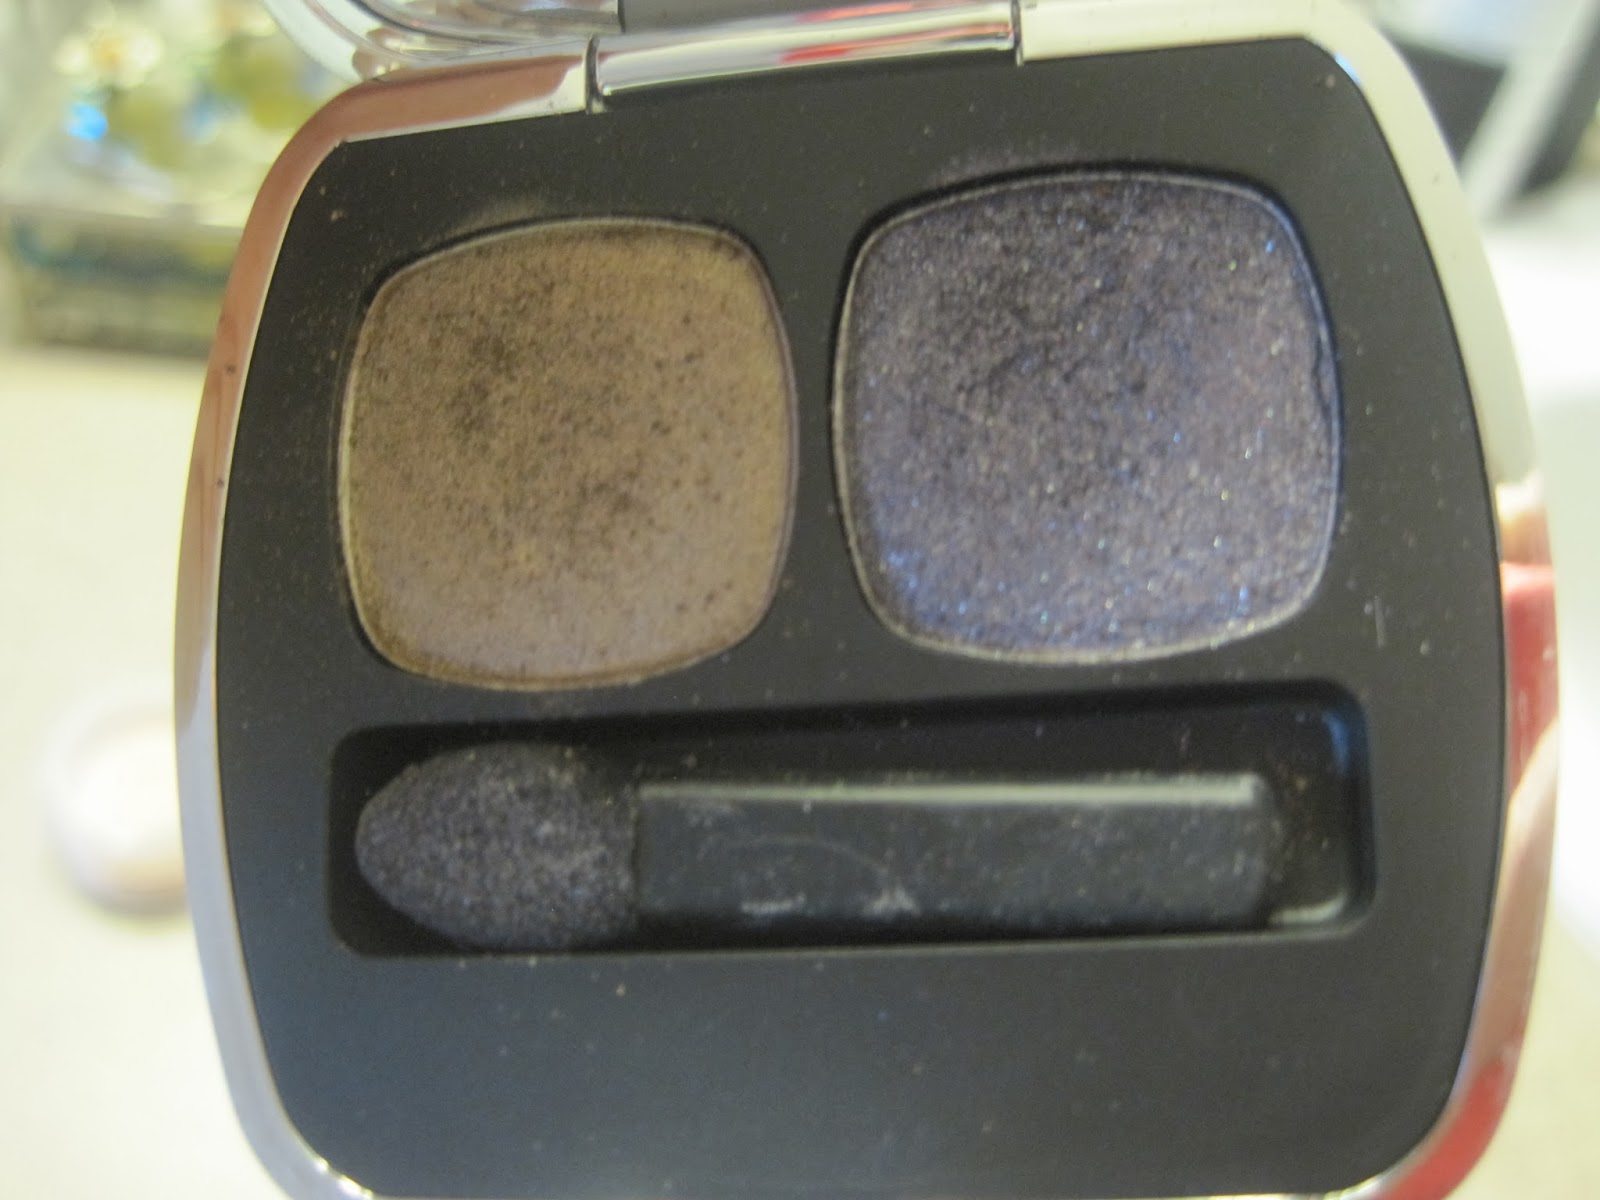
READY Eyehadow: Guest Star, Uncensored
Lash Domination Volumizing Mascara
Flawless application face brush
READY Luminizer: the Daydream
Blush: Beauty
Marvelous Moxie Lipgloss: Glamorista


READY luminizer
The daydream seems like a very soft pink color in the compact. On my skin it only give a hint of pink but gives your skin a shimmery pearlescense. It is described as a "pink sugar glow" I'm new to the bareMinerals luminizer and I have to use with a very light hand or I feel like a disco ball. It is NOT glittery but the shimmer is nonstop. I do like this product, but it is not every day wear for me. It might be the lightness of the pink that makes it seem so shimmery. You can check out a similar product here in a bit darker color: READY luminizer duo for 24 bucks. It is also a mirrored compact which is fantastic. Never know when you need a mirror! The more I wear this the better I get at applying without going overboard.


   Matte Eyecolor

Queen phyllis is described as "buttercup" in color. I think that description really fits. Even though this is listed as a matte eyecolor, it definitely has a sheen. It has a great creamy and soft texture. The pigmentation is great. I have other bareMineral loose eyeshadow powders that I really am not a fan of, but this color is amazing. I have such a hard time finding golden colors that don't look harsh. This could be a multitasker in your routine. It has enough sheen that it would be a great highlighter as well as a base for your eyeshadow. It is an every day color. It would be great alone as a no makeup look. I own the Vanilla Sugar color but it is a bit too orangey in comparison. I will definitely snap up this color if I find it as a single. I used it as base and under my brown bone.

READY Eyeshadow


This is my first from the brand's READY collection. 20 bucks will buy you a set of two colors. Check them out here. The set included in this collection is called The Late Show. It includes a bronzey color Guest Star, and a blue/purple hue called Uncensored. The bronze color is very highly pigmented and creamy. Bronze can be another one of those easily unflattering colors but this blends beautifully. The indigo color, as its described, is not as pigmented for some reason and has a glitter to it. It is not as soft and creamy as the bronze. The color is dark but not too dark for day wear. It would look great on a multitude of skin tones. I used bronze on the lid and blended the indigo into the crease.


Blush
I'm a big fan of the all over face colors from bareMinerals and I tend to choose those for my blush because they give you a flush of color without the heaviness of some blushes. Glee is a highly recommended color, but my fave is Rose Radiance for my fair skin.
I hardly every use blush that comes in a compact. I love the loose blushes from bareMinerals. Easy to apply. Almost foolproof. The blush that comes with this collection is Beauty. It runs 19 dollars by itself. Not bad seeing how these tend to last me a LONG time, and almost always use blush (or the all over face color). I really haven't found a blush I like better so it gets used almost daily and it STILL lasts me. Beauty, the color in this collection, is a really bright true pink. It is very youthful in nature. It is NOT a color I would recommend to everyone. It is PINK and very well pigmented. If you aren't into a heavy blush, try the all over face color! My camera does not do the pink justice when I swatched it on my arm, but you can see it in my whole face picture.


Mineral Veil
Another product I love from this brand. I was using another loose powder recently, and have missed my mineral veil! Is powder worth 20 bucks? I say yes. I have tried a variety of drugstore powders that are just a train wreck. This gives you a soft finish, without being too cakey. I also love the sifter that keeps you from spilling it! I can't tell you how many times I've dumped minerals down the sink.


Marvelous Moxie Lipgloss in Glamorista

This is my first bareMinerals lip gloss. As you can see from this swatch it is nonstop shine! It is a plumping formula and tingles when you wear it. It costs a whopping 18 dollars and you can view some more colors here. Glamorista is a soft pink color that works well with this collection. The pigmentation is middle of the road for lip gloss. I like it for this kit, but I'm not sure I would spend that much on a single. It is a decent size though. My other comment would be that the angled applicator throws me off because I'm not used to it and my preference would be the straight applicators as weird as that sounds.

Lash Domination Volumizing Mascara

I have VERY short lashes, as you can see. This does a great job volumizing but I need a bit more lengthening. Overall I like this mascara. I have no complaints. It does not clump and it gives great volume. It doesn't add as much length as I would like. For 18 dollars that this costs, I would say you can get the same effects from a drugstore mascara. Again, great in this kit, but probably not something to run and out buy as a single.


Flawless Application Brush
I have always loved bareMinerals brushes. This brush is more densely packed with bristles than some of my other brushes. I personally like fluffier brushes for easier application and blending. This brush works well for the lumizer and blush.


I really enjoy the bareMinerals color collections. Individually, bareMinerals can be costly and add up quickly. The color collections are a great way to build up your products for a lot less. I got mine at Ulta on sale for 36 (was 49). The products I got were definitely worth more than that. 8 full size products around 20 bucks a piece... this kit is probably 150 worth of product. It is also a great way to try a variety of their products so you can know what to splurge on individually.


Monday, October 28, 2013

Ipsy, October 2013: A Review


Woot woot! Ipsy is doing it right this month. I'm loving what a variety of samples I received. Can't say much about the ugly ugly bag. I couldn't wait to dive in and sample. You can tell it is a great bag when I don't want to wait to try things out.


Ipsy won over my heart this month by giving me a nail polish sample. Zoya! The color is Giovanna. I have heard great things about this brand. It is a color I don't currently own which is even better. This has a pearlescent metallic sheen that is really great. It's hard to pick up on camera the depth this polish has. It is described as an emerald green, and it truly is even though I feel like at first glance it looks more teal.


StyleSexyHair Spray Clay. Kind of a flop so far. I knew it wasn't really going to work for my hair. Wrong kind of product but right BRAND of product. I can tell you that this brand of hair products is amazing. I have tried both the Big Sexy Hair line and the Healthy Sexy Hair line. I love their Chocolate Soymilk shampoo! Sulfate free and smells like a damn chocolate bar. Who wouldn't like that? This spray clay is from the Style Sexy Hair line. It is to create textured hair with a matte finish. My hair goes limp very quickly, so I think if I am going for a big hair night this may be the ticket. I was attempting a flat iron with a bit of edge to it... not quite there. The spray comes out VERY forcefully. As a first attempt with a product I've never used I would say there is room for improvement. Texture? Yes. Good texture? Not so much. I think this will work nicely when getting my hair ready for an updo.


Coastal Scents: Medium eyeshadow brush. I am loving it and using it all the time. The even better news? Easy on the wallet! 3 dollars for the eyeshadow brush I'm sampling. It seems like very good quality and I was surprised to see it was that cheap. I have more expensive brushes I don't like as much. It looks like they only sell through their online site. I'd be interested to try some of their makeup!


Bellaterra mineral shimmer eye shadow in Navy. Available through the Bella Terra website for $15. To me that's a lot to throw down on one single color. If I were to purchase I would want it to be a color I wore all the time. The pigmentation is actually pretty good. I used the tiniest bit as I knew I wanted a day look. This is just very quick application as I was pressed for time and headed out the door to an appointment. I used a neutral lid and just smoked out the crease a bit. Very wearable for a Navy color. I would definitely do a different lip color if I hadn't been sampling my lip pencil at the same time....It did not take very much at all and produced excellent color. The website also recommends adding it to nail polish, using it as a body glitter (not in navy unless you want to look bruised!), using a wet brush for a cream eyeshadow, using a wet eyeliner brush for eyeliner, using it with clear mascara for a pop of color, mixing with lip gloss, or even using it as hair streaks with hair gel. Interesting suggestions. 60 different shades through their website.


Starlooks lip pencil in Tipsy. Holy orange undertones batman!! I thought this would be pink but it is like a flourescent coral. This picture doesn't even do it justice! I was so hopeful when I first glanced at the pencil because it seemed close to my favorite pencil...  I used straight up pencil with a little lip gloss over the top. I will have to blend this color with something a little less LOOK AT ME.

PS. What is going on with my one eyebrow?!


Here it is next to my beloved "Radish" colored lip pencil. If only it weren't so orange! Bummer because I have yet to find a color that is my radish color. It is THE color for my lips, but the brand (Jane) went away for a long time. They have now re-branded and don't carry lip pencils. Some day I'll find a dupe... today is not that day.


Join me on ipsy and subscribe to the Glam Bag! You get 4-5 beauty products every month delivered to your door, for just $10. Michelle Phan curates the bags! Check it out here: http://www.ipsy.com/?refer=u-hkeep4gyw4of1rcp